To keep track of tools and equipment, you do four things: list every item in one place, label each one, assign it to a person or a job site, and check it in and out as it moves. Give each tool a home, protect the expensive gear, and audit now and then, and you always know what you own, where it is and who has it.
It pays off fast. Industry surveys put the annual loss of portable tools at 5% to 10% through theft, misplacement and damage, and each replacement runs $500 to $3,000. At the heavy end, the National Equipment Register and the National Insurance Crime Bureau estimate construction equipment theft at $300 million to $1 billion a year, and fewer than a quarter of stolen gear is ever recovered. For small tools, recovery is lower still, because most thefts never get reported. The tools you can least afford to lose are the ones that walk off quietly, a drill here, a grinder there, until the replacement bill turns into real money.
There is a people side too. A survey by the Chartered Institute of Building tied about 43% of tool theft to employed or subcontracted staff, and in a third of cases nobody could say who took the item. That is the gap a real system closes. Here is how to build one, step by step.
Step 1: Put every tool in one central list
You cannot track what you have not written down. Start with a single list that holds everything, from cordless drills and grinders to ladders, generators, levels and test gear. One list, not a sheet per van and a different one in the office.
For each item, record:
- A unique ID and the item name.
- Model and serial number.
- Category, value and condition.
- Where it lives and who it is assigned to.
- A photo, so there is no argument about which drill you mean.
- Status: in stock, checked out, in repair.
If your gear is already in a spreadsheet, import the file so each row becomes an item and you keep the list you already built. About 22% of HomyScan teams start their catalog this way. A spreadsheet is a fine start for a handful of tools, but it strains as the list grows, because every entry, transfer and service note is manual, and manual entry drifts. Decide early whether the sheet still serves you or whether the time spent fixing it now costs more than a tool that does the job for you.
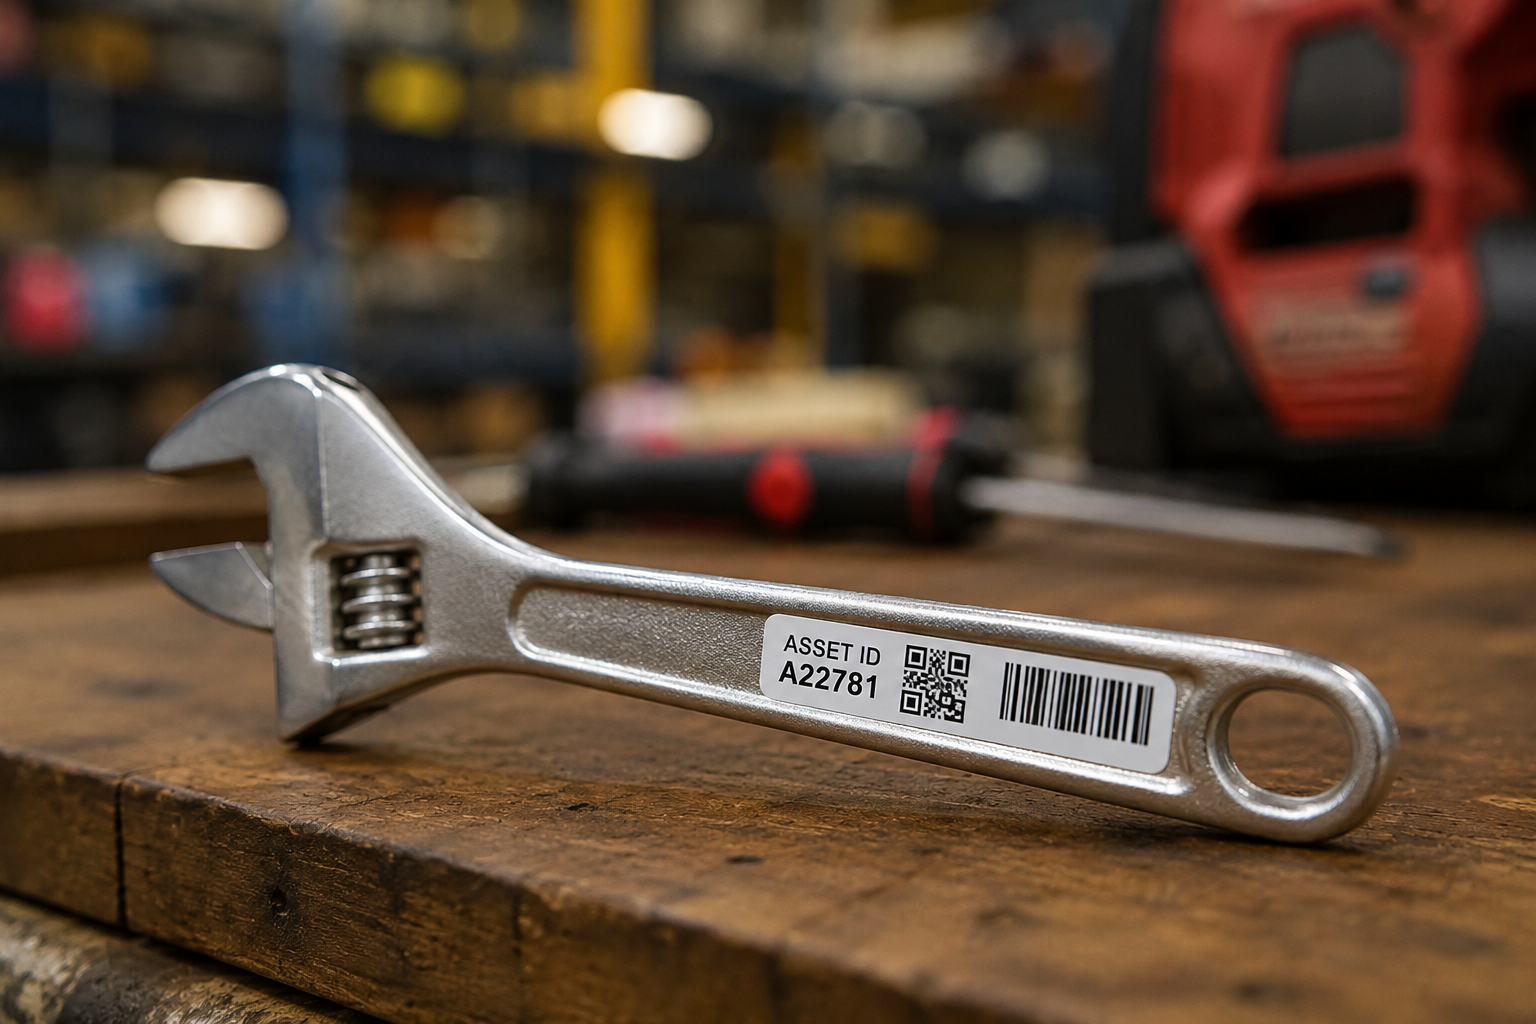
Step 2: Label each tool so you can scan it
A label turns a tool into a record you can pull up in a second. Give every item a unique ID and a tag. You have three common options, and you can mix them:
- Barcodes are cheap and everywhere, fine for most tools.
- QR codes are also cheap and hold more information.
- RFID lets you scan many items at once, but needs a special reader and costs more upfront.
On a job site, use durable labels that survive dust, water, chemicals and knocks, and stick them on a clean, flat, easy-to-scan spot. Once items are labelled, scan one with your phone to find it, change its location, or check it out. No special hardware, the camera does the work.
Step 3: Assign tools and check them in and out
This is where accountability starts, and it is the step that actually stops the losses. When a tool leaves, check it out to a name or a job site. The record shows who has what and when, and the item stays tied to that person until it comes back.
The rule is simple and it works: whoever checks a tool out owns it until they check it back in. When the crew knows the system shows who had the missing item, things come back. This is exactly what closes that 43% staff-linked theft gap and the cases where nobody could say who took the tool. Manual tracking on a shared sheet carries about a 3% error rate and falls apart the moment two people edit it, so a scan that updates the record itself keeps the list honest without anyone playing policeman.
For crew members who are slower to adopt an app, keep a simple printed sign-out sheet near the tool store as a backup. It captures the basics and reinforces the habit while everyone gets used to scanning.
Step 4: Give every tool a home
Even a good tracking system loses its edge if tools end up scattered. Give each one a designated place. Labelled shelves, stackable bins and tool cribs make items easy to find and easy to spot when one is missing. Shadow boards, the panels with an outline for each tool, show at a glance what should be there and what is gone, and they cut the time spent hunting for the right tool.
Storage is also security. Keep gear indoors where you can, and put the high-value items in a restricted area or a locked crib. On site, a lockable container can hold smaller machinery overnight. A tidy, labelled layout plus a tracking record is the surest way to both find tools fast and notice loss early.
Step 5: Track movement across vans and job sites
Tools rarely sit still. They move from the warehouse to a van to a site and back, and they cross between crews. Log each move so the list always matches reality, and you can see at a glance what is on which crew or job site. When a job wraps, you know exactly what should return before the crew packs up, instead of discovering a missing grinder three sites later.
Step 6: Protect high-value gear with GPS
Tags tell you where a tool was last scanned. For the expensive machines, a GPS tracker tells you where it is right now. Real-time tracking adds a layer of security on top of your labels, and it is the only option that can help you recover an asset after it has gone, rather than just record that it left.
More advanced trackers add geofencing, an invisible boundary around your yard or site. If a machine crosses it outside working hours, you get an instant alert and can act before the gear is long gone. Even visible trackers deter theft, because a thief who spots one tends to move on.
Keep rented and borrowed gear on the same list
If you rent equipment in for a job, or lend your own out, track it the same way with a clear due-back date. A rented breaker or lift is money on the clock, and a missed return quietly turns into an extra week of rental you never planned to pay. One list for owned, rented and lent gear means nothing slips through the cracks.
Step 7: Audit and maintain what you find
Once or twice a year, walk the racks and the vans and scan what you find against the list. Anything in the system but not in the room is a ghost tool, gear you are still insuring and counting on but no longer have. A scan-based count takes a fraction of the time of a manual one, and it logs who checked and when.
While you are at it, use the record for maintenance. Keep a service history on each item and set reminders, because planned servicing prevents the breakdowns that stop a job, and a tool you cannot find is a tool you cannot maintain. Proactive maintenance keeps gear available and extends its life, which is its own kind of saving.
Step 8: Get the team to actually use it
A tracking system is only as good as the crew that uses it. This is where most systems quietly fail, not on the software, on adoption. Show people how to scan, check out and return, and explain why it matters, that lost tools cost the business and slow everyone down. Keep the steps few and the labels easy to reach.
Find one or two people on the crew who pick it up fast and let them help the others. Peer habits stick better than a memo. Once scanning is part of the daily routine, the list stays accurate on its own.
Spreadsheet or app: when to switch
A spreadsheet works when you have a few tools and one person updating it. It breaks when more than one person edits it, when gear moves between sites, or when you need photos, check-out history and a location per item. At that point the work to keep the sheet right costs more than the app that does it for you, and a phone-based system means the crew updates the record where the work happens, not back at a desk.
A simple system you can start today
Keeping track of tools and equipment comes down to a few habits: list it, label it, assign it, check it in and out, give it a home, and audit now and then. Protect the expensive gear with GPS, keep rentals on the same list, and get the crew to scan. Do that and the gear stops disappearing, crews stop waiting on missing tools, and you always know who has what.
You can set this up in an afternoon and try it free for 15 days, no card.